 Many people who move into one of our new homes are excited to decorate it for the holidays. With this in mind, Hartz Homes would like to share some really helpful advice on turning wood pallets into festive creations.
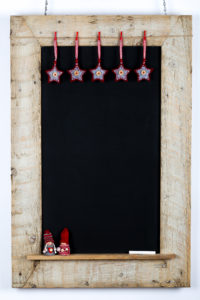
After all, wood pallets are great for creating a ton of cool holiday decorations. The pallets are a good source of rustic raw material that is easy to work with and suitable for both indoor and outdoor projects.
Getting creative ideas
There is an avalanche of photos showing awesome pallet projects on the internet. For inspiration for your project, just Google Pallet Christmas Decorations or check out the Holiday Pallet Projects on Pinterest.
You’ll discover that most pallet projects are fairly basic and easy to make. In fact, usually with a good photo of the finished project, the average DIYer does not need any step-by-step instruction. Some projects use complete pallets that are just decorated with paint. Others use the wood from a dis-assembled pallet.
 Many projects use wood from dis-assembled pallets.
Most likely, picking out your project will be the easiest part. The challenge will be finding a pallet, and then taking it apart if it has to be dis-assembled for your project.
Finding free pallets
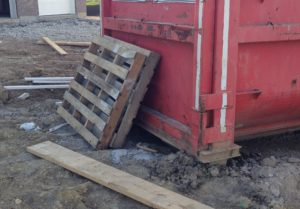
The golden rule here is: always ask! Don’t assume that pallets leaning against a wall or pilled by the curb are free for the taking. Often, businesses pay a deposit for pallets and are charged if they are not returned. So, be polite and ask if it is okay to take them.
The best places to ask? Well, you can start with Hartz Homes. Building materials and supplies, including bricks and roofing, are often delivered on pallets. Ask the superintendent at one of our jobsites to set aside a pallet that would otherwise be tossed into the dumpster. Caution: It is very hazardous for you to retrieve a pallet from the dumpster on your own.
 Ask a superintendent to set a pallet aside for you.
You can also try small garden stores and automotive shops, as they seem to get inundated with pallets, and in many cases struggle to get rid of them.
You are in luck if a new business is moving in around you. All their fixtures and products will probably be delivered on pallets. If you stop by and ask, they may be more than happy to give you as many as you can haul away. After all, they may be motivated to help out and establish positive relationships for their new business.
Then, there is always Facebook. Let your friends know what you are looking for. You’d be surprised to find what people have sitting in their garage waiting for the trash. Also, many neighborhoods have Facebook Community Pages set up to look and ask for items for free, for sale or trade.
Taking pallets apart
The process of taking pallets apart can be a lot harder than you think. Most pallets are built strong to hold a tremendous amount of weight. And, since pallets are built for extensive reuse, they are designed NOT to come apart.
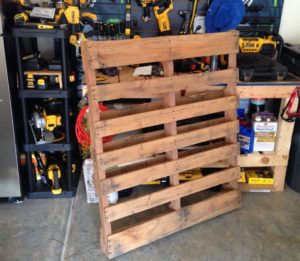 Once home, you may have to take it apart.
The slats are usually secured with spiral twisted nails that have been pretreated with glue. The heat created by the nailing activates the glue. The twist prevents pull out.
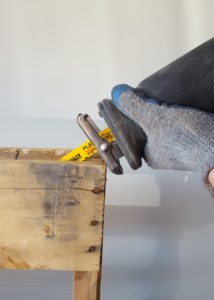
You can use a crow bar and hammer to pull the slats apart. But, a much easier method uses a reciprocating saw to dis-assemble the pallet in just a few minutes. This method leaves the embedded nail fragments which actually add great character to your project.
Before making any cuts with your recip saw, invest in a 12″ demo/construction blade. They can rip apart a pallet in a few minutes—much faster than a standard 5” blade.
Also, remember to wear eye protection, gloves, and sturdy footwear when cutting the pallets apart.
Once you are ready to dis-assemble your pallet, place it on end, with the nails parallel to the ground. Using your recip saw, start cutting down and through the nails that hold the wood slats to the side supports, as shown in the photo.
 Continue cutting all the way down to the bottom piece. When you get to the bottom piece you’ll want to flip the pallet over and cut it so the blade does not hit the ground. After cutting both sides, the 2×4 support should easily pull away from the pallet. Continue this cutting process on the other side.
Once both sides are removed, the center support is the only thing holding the pallet together. Use the recip saw and cut the remaining nails.
Now, you are all set to create a beautiful decoration with the wood you reclaimed from the pallet!